
What is cPanel?
One of the most well-known Linux based control panels in the world for web hosting is called cPanel. It allows all of your services to be managed from one place. Most web developers opt for cPanel as the standard in the industry. Pretty straightforward to use and highly intuitive at that, cPanel provides ultimate efficiency to your web hosting account and all of its duties including creating new email addresses and FTP users, Subdomains, Monitoring resources and installing software.
What is cPanel Hosting?
Cpanel hosting involves cPanel installation as it is basically Linux web hosting. cPanel does have its pros and cons, but it is a boon in the majority of the cases. It is the best option if you want to choose a control panel solution.
How To Install CPanel
A custom installation script is provided by cPanel which just needs to be downloaded and executed to successfully install cPanel. It is preferable to be done in a server that is newly provisioned in order to eliminate errors in installation.
You can accomplish this by putting in practice a single command in the terminal.
cd /home && curl -o latest -L https://httpupdate.cpanel.net/latest && sh latest
The working directory present is changed by this command to /home. It also puts the installation script into practice and ensures the latest cPanel package is downloaded.
The installation of WHM/cPanel is successfully completed when the following screen appears.
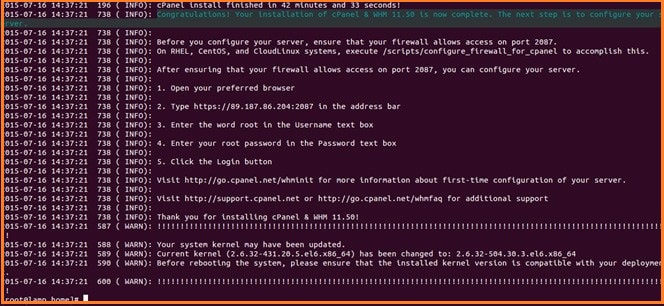
CPanel/WHM Setup Via Web Interface
cPanel/WHM is listening to the ports 2086 and 2087, later when accessed via HTTPS.
Your WHM’s web interface can be easily accessed using your browser by navigating to https://IPADDRESS:2086 or https://IPADDRESS:2087 for a connection that is encrypted.
You will end up on the WHM login window. You need your Root user and password to login as ‘Root’ user access is mandatory I’m WHM.
The initialization setup page is the first page that shows up once you log in. The license agreement is displayed that you can accept and proceed to the following page that sports the Networking setup.
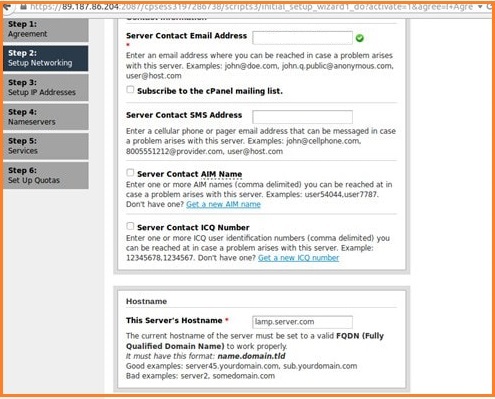
You need to state on this page the following things:
Server Contact Email Address: your notification emails are sent to this email address by the server.
Server’s Hostname: The precise Hostname given to the server.
Primary Resolver: cPanel server gets in contact with the Prime Name Server for Domain Name Resolution.
Secondary Resolver: In order to resolve Domain Name, cPanel contacts the Secondary Name Server. It is put in place for emergencies in which there is no response or resolution from the Primary Name Server.
Select the main network/Ethernet device: It is your main ethernet device’s name which by default is eth0.
Select ‘Save and Go to Step 3’ to go to the page of IP Address setup.
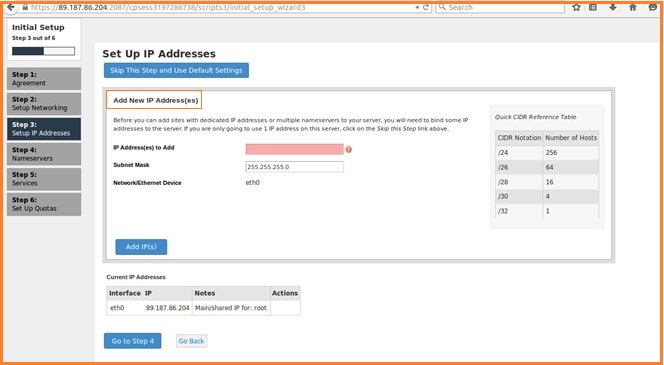
In case you have a single IP, you can skip this step and move on to step 4. If your server has multiple IPs present, you can add the IPs while separating them with a comma in the field coloured red, as shown in the image above.
The page for Name Server setup comes next.
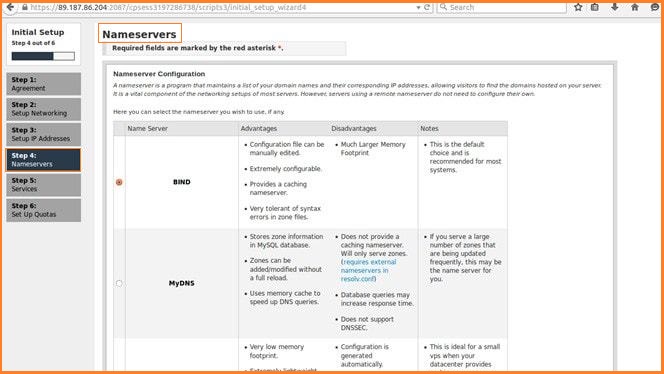
You can easily select the Name Server Application on this page that you want to use, which could include MyDNS or Bind. You can decide if you want the domains you host or are hosted at a different location to have this cPanel server as its authoritative Nameserver.
You will have to pick a name for the Name Servers, like webmaster.com.
Once this data is entered, select ‘Save and Go to Step 5’. It will help you navigate to the Service Configuration page.
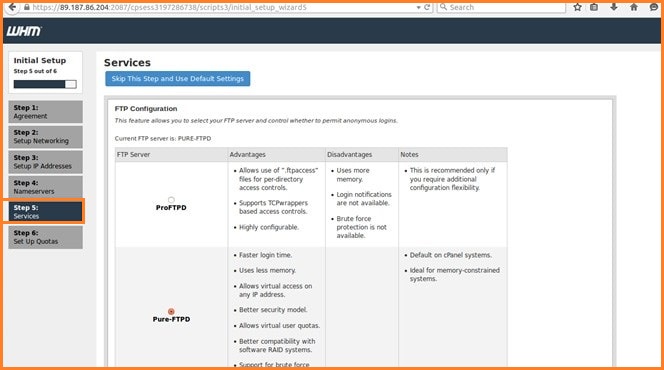
You can state the following things on this page.
The FTP server that you choose for install. You have options like PureFTPD and ProFTPD, out of which the default option would end up being PureFTPD. In case, you want to forgo the installation of an FTP server in your server, you can simply select the ‘Disabled’ option given below.
Installation of your choice of Mail server. Dovecot and Courier are the choices presented to you, out of which Dovecot is the default installation. If you do not want your server to include a mail server installation, simply select ‘Disabled’.
Enable cPHulk Brute Force Protection configuration. This function will help you protect all of your web services from brute force originating from malicious sources.
Once you select your choice of options, choose ‘Save and Go to Step 6’.
It will help you navigate to the Quotas page that concludes cPanel/WHM Setup’s last step.
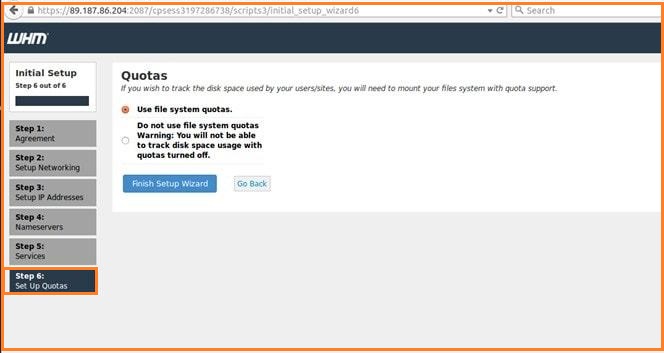
You can select ‘Use file system quotas‘ in case you want your account’s disk quotas calculated.
Select ‘Finish Setup Wizard’. Your cPanel/WHM account is now successfully set up and ready for use.
- Conclusion
Brilliant! Now that you have your cPanel/WHM setup you have got a variety of tools at your disposal to run a web hosting solution. The cPanel interface will help your customers with website management, intranets as well as making sure that their online properties run without any hindrances. On the other hand, WHM helps you manage your server resources and keep them in control.
 Sales
Sales  Support
