

Today, let’s learn how to enable designer mode in phpMyAdmin!
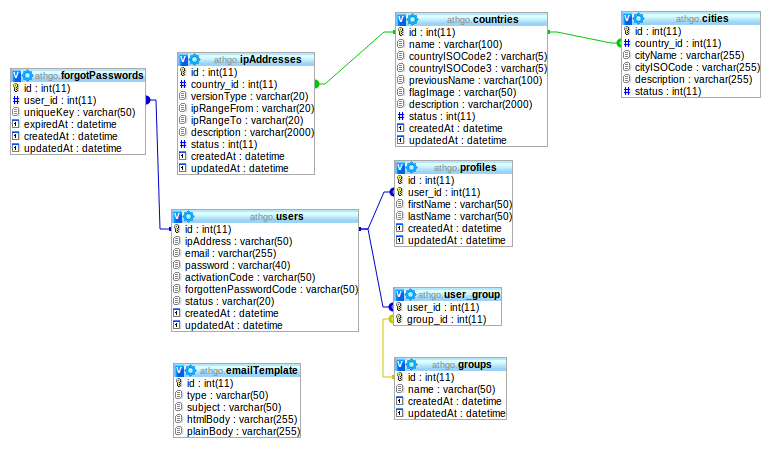
Designer mode in phpMyAdmin allows us to visualize databases, tables, and the various fields in the form of a diagram. It’s especially useful when designing, modifying, or exploring database systems, providing a convenient way to view relationships between tables.
In this tutorial, we’ll focus on activating designer mode in phpMyAdmin version 4.1, and please note that this tutorial has been validated under WAMP.
Begin by locating a file named config.inc.php in the phpMyAdmin installation directory.
$cfg['Servers'][$i]['pmadb'] = 'phpmyadmin'; $cfg['Servers'][$i]['bookmarktable'] = 'pma__bookmark'; $cfg['Servers'][$i]['relation'] = 'pma__relation'; $cfg['Servers'][$i]['table_info'] = 'pma__table_info'; $cfg['Servers'][$i]['table_coords'] = 'pma__table_coords'; $cfg['Servers'][$i]['pdf_pages'] = 'pma__pdf_pages'; $cfg['Servers'][$i]['column_info'] = 'pma__column_info'; $cfg['Servers'][$i]['history'] = 'pma__history'; $cfg['Servers'][$i]['designer_coords'] = 'pma__designer_coords'; $cfg['Servers'][$i]['userconfig'] = 'pma__userconfig';
2. Once you locate the file, open it and make the necessary changes. Save the file after making modifications.
3. Import a file in SQL format to allow phpMyAdmin to have its own table containing the configuration. Navigate to the root of the web interface of phpMyAdmin and click on “Import.”
4. Click on “Browse” to select the SQL file. Choose the file named “create_table.sql” from the examples in the Phpmyadmin configuration directory.
5. After importing the file, restart phpMyAdmin. For WAMP users, you can do this by left-clicking and selecting “Exit.” Remember to close your browser before restarting WAMP.
6. Return to phpMyAdmin, and within a database, you can now enjoy the designer mode.
7. To confirm that your designer menu is activated, it’s recommended to clear your web browser cache or try accessing it with different browsers after completing these steps.
If you encounter any difficulties during the process, please don’t hesitate to contact host.co.in. We will be more than happy to assist you.
Sarang Khedkar